Cleaning your home’s well-used spaces is an easy way to stay healthy year-round, but it’s often easy to forget about the shower. Running back and forth between work, school, errands, and more can make it hard to find the time to get rid of all of that grime lurking underneath your shower’s caulk lines.
But the grime isn’t going to go away until you attack it, which is why we built a quick guide to help you remove the residue, clean the dirt away, and then recaulk your shower properly.
Here’s what you need to know.
Tools Needed:
Let’s start with a few tools that you’ll want to have on hand before you go full “Operation Recaulk.” Having everything on hand ahead of the project reduces the number of times you have to run to the local big box store down to a blissful zero, and anything we can do to stay out of heavy traffic is a good thing.

Here’s a quick list of what you need:
- Silicone bathroom caulk (latex will also work)
- Caulking gun
- Utility knife
- Painter’s tape
- Mold cleaner
- Other cleaning supplies as you see fit.
Everybody has a different list of cleaning supplies they like to use in the shower, so we’ll leave that up to you. The important part is that you have caulk, a caulking gun, the knife, tape, and the mold cleaner. It’s going to get grimy, but we might as well keep going.
Step One: Choose the Right Caulk
Are all caulk products created equal? Not at all. Some caulk ends up crumbling quicker over time, requiring you to come back with a better product that will seal things properly. The ideal caulk we’d recommend is a good silicone-based caulk, but hybrid products on the market are designed to give you more flexibility than just silicone alone.
Step Two: Remove the Old Caulk
One of the hallmarks of a bad caulking job is trying to rush through the removal of the old stuff. When you don’t remove the old caulk, the new stuff doesn’t have enough surface area to attach correctly.
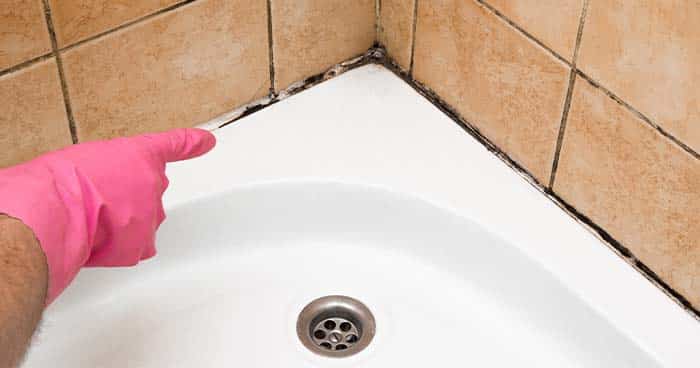
Step Three: Clean the Mold
This is the icky part, but mold is problematic in a bathroom. Mold spreads, causes respiratory issues, and gives a downright awful smell to a bathroom, which certainly doesn’t need any help in the dreadful smell department.
Step Four: Use the Painter’s Tape as a Guide
Painter’s tape is one of the most versatile pieces of any toolkit, and we can use this tape to mark exactly where we want the caulk to go. The last thing you want is to get caulk all over somewhere it’s not supposed to be, so this step is an absolute must.

Step Five: Get to the Caulking
It’s time for the main event: caulking the shower. Get the caulk and make thin, slow lines with the caulking gun. While some guides suggest that you can use the caulk right from the tube, the best applications do come from using the caulking gun.
Step Six: Smooth Away, Clean Up, Let Things Rest
This is the last step, but it’s pretty important: you need to smooth the caulk down. Bubbled caulk does not seal well, so using the knife to cut away any excess is important. It’s also important to let the caulk set a full 24-hours before anyone uses the shower.
This means that if you need to get a shower in, you’ll have to use another bathroom or head down to the gym for that cleaning session.

As Alton Brown says, “Your patience will be rewarded.” We agree.
Final Thoughts on Your Fresh, New Caulk Job
After the shower rests for 24 hours, you get to step back and admire your new caulk job. How long does the caulk last before you have to start over again? Generally speaking, caulk lasts roughly five years. Of course, if you see mold creeping in or cracks, you may need to replace the caulk sooner. Use your best judgment but taking your time replacing the caulk will yield great results, every time.